The Pulling & Stacking Console
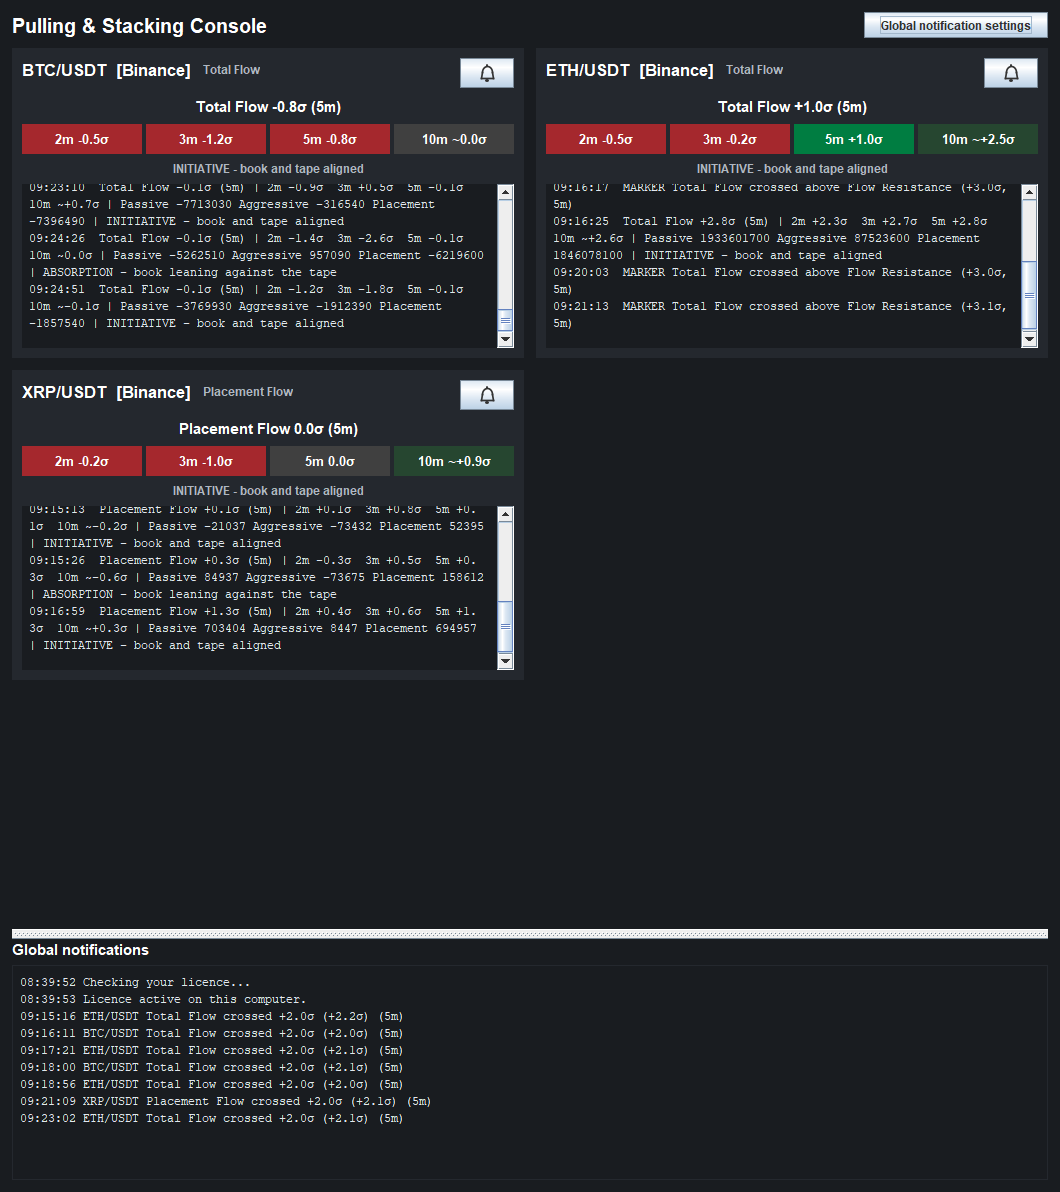
The Pulling & Stacking Console is one window that shows every instrument the indicator is running on. Each instrument gets a tile with its live readout, the four-window σ ladder, and a scrolling log. Alerts for all instruments collect in a Global notifications log at the bottom of the same window.
The detailed readout lives in the console instead of being stamped over the chart,
so the flow lines on the chart stay clean. On MotiveWave the console is a window of
its own, titled Pulling & Stacking Console (MotiveWave). It opens once the terms
are accepted.
What a ticker tile shows
Each tile has, from top to bottom:
- Instrument name and the feed it is subscribed through, the line the
tile reads (for example
Total Flow,Placement FloworBuy / Sell), and a bell button for that instrument's alerts. Every reading on the tile is about that line. It is the line the chart is set to unless Console Mode chooses the other family; then the chart's line is named too:Total Flow (chart: Buy / Sell). - Headline. One of:
Total Flow +4.2σ (5m): the live reading on the primary window. On a chart set to another core line the headline names it:Passive Flow -3.6σ (5m).Buy Line +3.5σ · Sell Line -1.0σ (5m): a tile reading Buy / Sell: both lines, each measured from the centre of their shared band.Total Flow +1.9σ (2m) - 5m band 40%: the primary band is still seeding, so the headline shows the longest window that is fully seeded.Total Flow ~+2.1σ (5m) - warming 40%: a provisional estimate (note the~).WARMING UP 12% - 25 min band: nothing is seeded yet.STALE - no events since 09:41:07(orange): no market events have arrived for longer than the stale timeout.WAITING FOR ORDER BOOK DATA: the instrument has not sent any depth data yet (see indicator states).PAUSED - licence required (see the indicator settings),PAUSED - checking your licence,PAUSED - licence in use on another computer,PAUSED - could not reach the licence serverorPAUSED - licence not active (see the indicator settings): the licence is not active on this computer, so the indicator draws nothing (see activating your licence).- The σ ladder. Four badges for the 2, 3, 5, and 10 minute windows, for the
tile's line. In Buy / Sell mode each badge shows whichever line is further
from the band's centre, named:
5m Buy +3.5σ. A badge is green when the reading on that window is bullish (buy orders stacked or sell orders pulled) and red when it is bearish (sell orders stacked or buy orders pulled). In Flow mode that means a positive reading is green and a negative one red. In Buy / Sell mode,Buy +2.6σis green andBuy -2.6σis red, whileSell +1.7σis red andSell -1.7σis green. A badge is grey with--while that window is warming up or the feed is stale. A muted badge with~is a provisional estimate (see indicator states). - State line when one applies:
! TOP OF BOOK FIGHTING THE DEEP BOOK(orange, the deep-book warning) orABSORPTION - book leaning against the tape/INITIATIVE - book and tape aligned(the book-vs-tape state). It can also say! ORDER BOOK DATA STOPPED - ...(orange: trades arrive but the order book does not update),No Level II depth receivedorNo market data received. ...; see indicator states. - A scrolling log. A line is added when the reading's status changes
(waiting for data, warming up, provisional, live, stale, paused), and, while
the reading is live, when the state line changes and the new state has held
for 10 seconds; a new
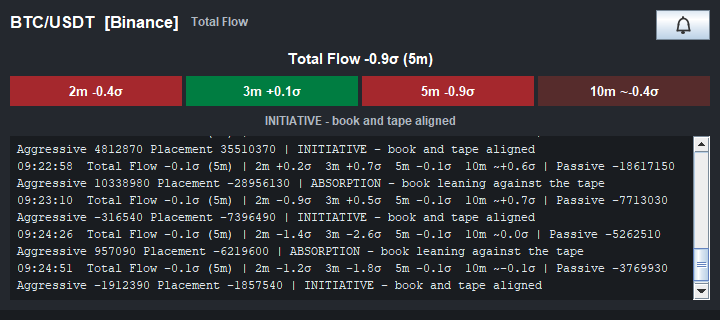
PAUSEDreason is added once it has held for 10 seconds too. The no-data hints (No Level II depth received,No market data received. ...) show on the state line only; the log keeps itsWAITING FOR ORDER BOOK DATAline. A steady reading adds no lines. Each line carries the full reading at that moment:
15:53:31 Total Flow +4.2σ (5m) | 2m +1.4σ 3m +2.5σ 5m +4.2σ 10m +4.0σ | Passive 2030 Aggressive 8 Placement 2022 | INITIATIVE - book and tape aligned
headline, ladder, the Passive, Aggressive and Placement components in
contracts, then the state. Alerts for that instrument's time bands appear in
the same log, naming the line: ALERT 5m Total Flow crossed +3.0σ (+3.4σ).
The log is bounded and scrolls automatically.
On instruments traded in fractions (for example bitcoin) the Passive,
Aggressive and Placement components are in millionths of a unit: 1 BTC reads
1,000,000.
Reading several instruments at once
Tiles arrange themselves in a grid that reflows as the window is resized. Each
window of each instrument warms up independently, so a newly added instrument shows
WARMING UP while the others are live.
- One tile per symbol, headed by the symbol and the data source in brackets, for
example
<symbol> [<data source>]. The same symbol from two data sources shares one tile. - Several charts of the same instrument share one tile. The first chart that loaded the indicator decides what the tile reads (its Line Mode, Console Mode, Primary Window and Stale After). If its study is removed, the next chart takes over. The other charts' own settings still show their values, and they take effect when that chart takes the tile over. Their Console Mode has no effect meanwhile, although it is not greyed out.
- The tile's
MARKERlines are that first chart's arrows. Arrows on the other charts are drawn on their own charts and go to MotiveWave's log and Alerts panel, not to the tile, so every line on the tile reads against the same window and band. - Each chart runs its own flow engine, so each chart warms up on its own.
- Tiles appear in the order the instruments were added.
Price-chart markers
If your eyes are on price, not on the flow panel, the markers bring the signal
to where you are looking. An arrow is drawn on the price chart, and a MARKER
line is added to that instrument's log on its console tile, when the line your chart trades from crosses
outside its own Resistance or Support on the primary window. Arrows always
follow the chart's Line Mode, whatever the
Console Mode:
MARKER Total Flow crossed above Flow Resistance (+3.2σ, 5m)
MARKER Buy Line crossed above Buy/Sell Resistance (+3.1σ, 5m)
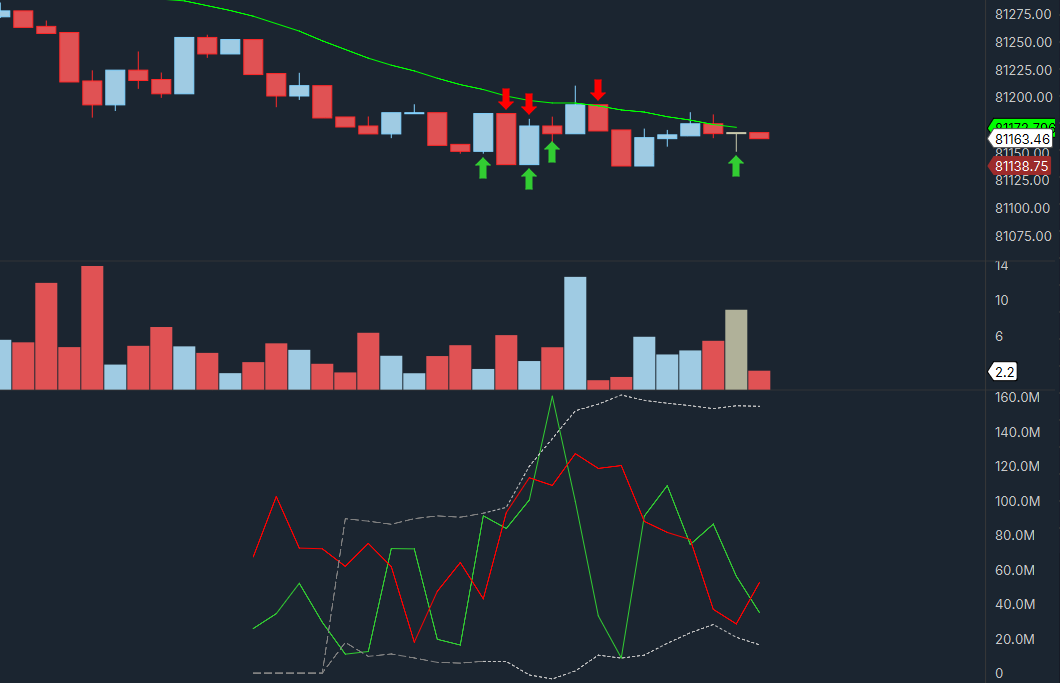
Green arrows below the bars mark bullish crossings and red arrows above them mark bearish ones; each sits on the bar where the Buy Line (green) or the Sell Line (red) in the panel below crossed outside its band. Shown with a 2-minute window and a 2σ band so that several crossings fit in one picture; at the defaults (5 minutes, 3σ) arrows are less frequent.
| Line mode | Lines that draw arrows | Against |
|---|---|---|
| Flow | The core line only (Total Flow by default) | Flow Resistance / Flow Support, sized from that line |
| Buy / Sell | Buy Line and Sell Line (each can be switched off) | Buy/Sell Resistance / Support of the pair on screen |
Every arrow quotes a σ figure, because every arrow is read against its own line's band. The arrow shows what the crossing means for the market, whichever line drew it:
- A green arrow pointing up, below the price, is bullish: buy orders stacked, or sell orders pulled, beyond the band. In Flow mode that is the core line crossing above Resistance.
- A red arrow pointing down, above the price, is bearish: sell orders stacked, or buy orders pulled, beyond the band. In Flow mode that is the core line crossing below Support.
So the Sell Line crossing above Resistance (sell orders stacked) draws a red arrow pointing down, and the Sell Line crossing below Support (sell orders pulled) draws a green arrow pointing up. The note in the console still names the line and the crossing. The arrow is drawn on the bar where the crossing happened: a bullish arrow 2 ticks below the bar's low, a bearish one 2 ticks above its high, and a Sell Line arrow 5 ticks out, so Buy and Sell arrows on the same bar stack outwards. Its price is set when it is drawn, so a bar that extends later may overlap it. The offsets are in ticks: on an instrument with a very small tick (bitcoin, for example) they are too small to see at a normal zoom, so the arrow sits on the bar's high or low and a Buy and a Sell arrow on the same bar overlap.
A hidden core line draws no arrows, and a band is only ever read by the line it was sized from.
- A marker is a prompt to look at the flow panel or the console, not a signal to trade.
- It uses the band you set (S/R Standard Deviations), needs no alert to be switched on, and follows the same minimum interval as the alerts.
- Markers are drawn only when the band is fully warm and the feed is live.
- Show Flow Markers On Price Chart in the study's settings is the master switch. In Buy / Sell mode, Buy Line Arrows and Sell Line Arrows choose which lines draw them. They are greyed out while the master switch is off and in Flow mode, where they do nothing; they keep their tick for when they apply again.
- Each arrow carries the name of the crossing, for example
Total Flow above Flow Resistance, which MotiveWave can show when you point at the arrow (depending on MotiveWave's own settings it may not show a tooltip). The same text is in MotiveWave's log and Alerts panel. - Each arrow also raises the indicator's MotiveWave signal Flow marker (line crossed its Resistance / Support); see MotiveWave signals.
If you cannot hear the alerts
Open Global notification settings in the console and press Test sound.
- If it reports that the sound played but you hear nothing, the problem is the volume or the output device, not the indicator.
- On Windows the sound is a Windows notification sound from the Windows
Mediafolder. If it cannot play, the indicator uses the system beep and says why, next to the button (Java audio failed (...); system beep used.) and once in Global notifications. On macOS and Linux there is no such sound file, so the indicator always uses the system beep. - Notification sound is off by default; alerts still appear as text.
Per-instrument alerts (the bell)
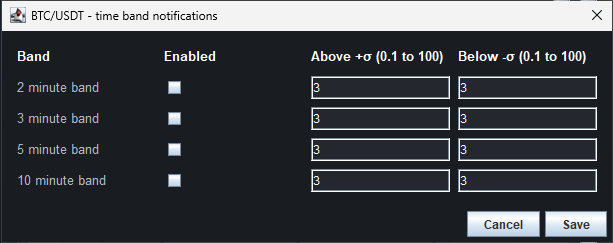
Click the bell on a tile to choose which time bands alert for that instrument, with separate thresholds for positive and negative readings of the tile's line: the line the console reads, which is the chart's line unless Console Mode says otherwise.
| Column | Meaning |
|---|---|
| Band | The 2, 3, 5, or 10 minute window. |
| Enabled | Whether this window alerts for this instrument. Off by default. |
| Above +σ | Alert when the tile's line on this window rises through this many standard deviations. Default 3. |
| Below −σ | Alert when the tile's line on this window falls through this many standard deviations. Default 3. |
When the tile reads Buy / Sell, the Buy Line and the Sell Line each alert on their own.
An alert fires when the reading crosses the threshold, and re-arms once the reading comes back inside it. Alerts never fire while a window is warming up or the feed is stale.
Save closes the dialog and keeps your choices; Cancel closes it and keeps the previous ones. The bell itself looks the same whether or not any band is enabled, so click it again to see which bands are on and their thresholds. An alert that fires is written to the tile's log.
Global notifications
The bottom section of the console is a single log shared by every instrument. Global alerts watch the line each tile reads, on the primary window (the core line for Flow, the Buy and Sell lines for Buy / Sell; by default the chart's line, see Console Mode) against one shared threshold, and are written as
15:53:34 BTC-USDT Total Flow crossed +3.0σ (+4.3σ) (5m)
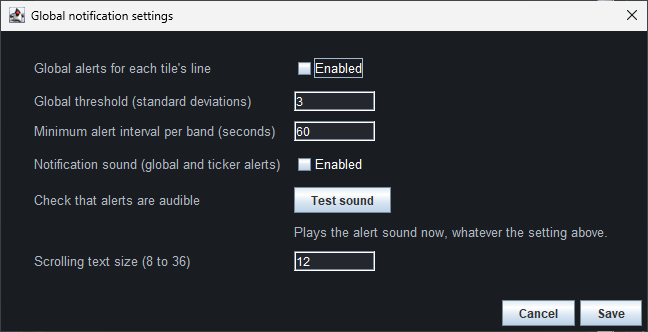
Click Global notification settings to change:
| Setting | Meaning | Default |
|---|---|---|
| Global alerts for each tile's line | Turns the shared alerts on or off. | Off |
| Global threshold (standard deviations) | The σ level that triggers a global alert. | 3 |
| Minimum alert interval per band (seconds) | Quiet period before the same band can alert again. Saving new thresholds re-arms the bands, so a band can alert at once on its new threshold. | 60 |
| Notification sound (global and ticker alerts) | Plays a sound for global and per-instrument alerts. Works while the console is hidden. | Off |
| Test sound | Plays the alert sound now, whatever the setting above, and says whether it played. Use it to check your volume and output device. | n/a |
| Scrolling text size (8 to 36) | Font size of the logs. | 12 |
Save closes the dialog and applies the settings; Cancel keeps the previous ones. A value outside its range is not saved: a message asks for a valid value and the dialog stays open. Nothing else on the console shows whether the global alerts are on, so open Global notification settings to check. A global alert that fires is written to the Global notifications log.
Opening, hiding, and closing
The console is enabled by default and opens when the indicator loads.
- Tick or untick Enable Pulling & Stacking Console on the Console & Markers tab of the study's settings and click Update.
- Closing the console window with its close button keeps it closed, also after a restart of MotiveWave, and within about a second Enable Pulling & Stacking Console shows unticked on every chart with the indicator. To reopen the console, tick it on any chart and click Update, and the other charts tick theirs again; or right-click the study's name at the top left of its panel (or one of its lines) and choose Show Pulling & Stacking Console. Unticking it on one chart closes the console everywhere.
- A settings window that was already open when the console was closed still shows the box ticked (MotiveWave does not refresh an open settings window). Its Update or Apply does not reopen the console: Global notifications say its older values were not used. Open the settings again to change it.
- The menu item Show Pulling & Stacking Console brings the console to the front, also from minimized. Update with the box ticked does the same when MotiveWave passes the Update on to the indicator, which it may not do when nothing in the settings changed. Opening the study's settings can minimize the console. Apply with the box ticked does not bring it over the settings window. The console also comes to the front when it opens because the study was added. The console is not listed in MotiveWave's Window menu; it is on the Windows taskbar. Removing the indicator from the last chart closes the console.
The console does not stay above other windows unless you tick Console Always On Top on the Console & Markers tab and click Update. It is off by default. It is one setting for the one console: the chart where it was changed last decides, every other chart's box shows the same within about a second, and a chart added later takes the console's value. While the study settings window is open the console steps behind it, also when an alert fires meanwhile, and it is on top again when that window closes. Other MotiveWave windows may stay behind it: the alert popup, and the question when you shut MotiveWave down, which can open behind the console and cover its Yes button. Minimize the console, or untick Always On Top, to reach such a window.
Logs keep accumulating and sounds keep playing while the console is hidden. The console never places trades.
Next: indicator states
Chart images. The chart images on this site show the indicator's display on market data, to explain what it draws. They are not trading results or trade recommendations, and the risk and hypothetical performance disclosures above apply to them. We publish no trading performance. The full text is on the disclosures page.